Monday, December 29, 2008

Spaghetti with garlic, anchovies and capers


After all the festivities of Christmas, I was in the mood for something clean and simple. This pasta dish has always been a favorite and you can't really get much simpler than this. Because this recipe has so few ingredients, technique is crucial in bringing out the best in the dish. And when I say technique, it's not that this dish is difficult to make. On the contrary, anyone can make this! There are just a few minor details that make a whole lot of difference in the end product.

1 lb spaghetti
2 whole cloves garlic, peeled and minced finely and uniformly (crucial point #1)
6-8 anchovy fillets
1/2 to 1 tsp. chili flakes
1/2 cup good olive oil
1/2 cup capers, drained and chopped

1. Cook the spaghetti according to package directions. Don't forget to salt the water and make sure not to over cook the pasta. (crucial point #2)
2. Meanwhile, place olive oil, garlic, anchovies and chili flakes in a large pan. Cook over low-medium heat (crucial point #3), stirring occasionally and breaking up the anchovies as you go along. Cook until garlic if soft but not brown. The point of using low heat is to cook the garlic very slowly until it becomes sweet, soft and mellow. If you use high heat, the garlic will burn and will acquire a bitter edge to it. That's definitely not what we want for this dish!
3. When the garlic is soft, turn off the heat and mash the garlic and anchovies together with the back of a spoon or spatula. You don't need to make a homogeneous mass, but you want the flavors of the anchovies and garlic to meld together as one. (crucial point #4)
4. Add the capers at this point.
5. By this time, the pasta should be about done. Drain briefly and put the pasta into the pan with the "sauce." Toss well and make sure each strand of spaghetti is coated with garlicky goodness.

That's it. Done!

Tuesday, December 23, 2008

Cheesecake on a stick

This was my Christmas "project" this year :-) I thought it would be a fun thing to bring to our office holiday potluck.


Some of my coworkers said that these 2-3 bite versions were perfect because cheesecake is such a rich dessert. I agree, but really now, who can ever stop at just one piece!?

Cheesecake:
5 blocks cream cheese
2 cups sugar
1/4 cup flour
pinch of salt
5 eggs + 2 yolks
2 tsp. vanilla extract
1/4 cup cream or half-and-half

melting chocolate
sprinkles
sugar
graham cracker crumbs
etc., etc.

1. Cream the cream cheese with the sugar, flour and salt until well mixed. The trick here is to make sure that you start with room temp cream cheese so that you can get it smooth and creamy.
2. Add the eggs one at a time, mixing well after each addition.
3. Finally, add the vanilla and cream. Mix well (again).

Pour the cheesecake batter into a 9x13 cake pan and place this pan in a larger pan. Fill the larger pan with boiling water until the water comes halfway up the sides of the 9x13 pan. Bake at 325 for about 40 minutes. Cool the cheesecake slight then place in the freezer until very firm.

Once the cheesecake is firm, scoop out balls and place them in a single layer on a parchment-lined cookie sheet. I have a small cookie scoop that worked very well for this step. Insert a stick into each ball and place the cookie sheet in the freezer until the cheesecake balls are frozen.

When everything is good and frozen, melt your chocolate over a double boiler (or you could microwave it). Dip the frozen balls in the chocolate and decorate before the chocolate hardens up. Place the finished balls on another lined cookie sheet and keep in the fridge until ready to serve.

This recipe isn't difficult but does take some planning since you have to cool the cheesecake, freeze the balls, cool the finished products, etc. I must say though that this is probably the most fun I've had in the kitchen in quite a while!

Cheese Pimiento


Cheese + mayo + pimiento (roasted red peppers) + a secret ingredient = one of my favorite spreads in the world! Nothing brings back memories of afternoon meriendas like cheese pimiento sandwiches. I think this spread is best on simple white bread (none of this 7-grain, flax seed stuff) or Fita crackers (which I guess is the Filipino version of Ritz crackers).

To make this spread, I used one small block of Cracker Barrel extra old cheese, one jar of roasted red peppers (which contained about 8-9 whole peppers), Hellmans low fat mayo, and the secret ingredient....don't gasp....condensed milk(!!!)....yes, yes, it's unusual to say the least, but trust me on this.

This recipe couldn't be simpler:
1. Grate the cheese into a large bowl.
2. Mince the pimiento and drain very, very well. You may need to push the pimiento against your colander to get out as much liquid as possible. Add this to the cheese. The chopped pimiento, not the liquid, ok?
3. Add 6 heaping tablespoons of mayo.
4. Add 2-3 heaping teaspoons of condensed milk.
5. Mix well.

The intermingling of the saltiness of the cheese, the tangy creaminess of the mayo, the kick of the pimiento and the hint of sweetness from the condensed milk is truly addicting.

Sunday, November 2, 2008

Happy Halloween!


I carved a pumpkin for the first time! The boys and I had a blast!

Roast Chicken with Garlic


Do you have a favorite steak rub? Mine is this one and I use it on practically everything...steak (of course), porkchops, chicken,potatoes, ribs, roasts, gravies, fish, etc, etc.

To make this super simple roast chicken, spatchcock a 2-3 lb bird and sprinkle it with your favorite rub. Preheat oven to 350. Meanwhile, in a cast iron pan, brown chicken with the skin side down for 5-7 minutes. Flip chicken over and scatter 2 quartered onions and 10-15 cloves of unpeeled garlic around the chicken. Stick the entire pan in the oven and roast for about an hour until the juices from the chicken run clear. Skim off fat from drippings and pour drippings, onions and garlic on top of bird.

Roasted Cauliflower


If you think you don't like cauliflower, think again. Cauliflower used to not be be one of my favorite vegetables, but prepared this way, it's a revelation. Son #2 actually requests for this dish! The cauliflower is made sweeter by the roasting and the caramelized, slightly crunchy edges makes for a much more interesting texture.

1 head cauliflower cut into florets
olive oil
salt and pepper

1. Toss florets in olive oil.
2. Season generously with salt and pepper.
3. Roast in a shallow baking pan in a 400 oven for 10-15 minutes until tender but not mushy.
4. If you don't get the caramelization you like, turn on the broiler for a few minutes.

Simple, no?

Panna Cotta and Pomegranates


Who can resist the smooth, velvety texture of panna cotta? This dessert is ridiculously simple to make but looks so elegant, especially when served with fruit. Don't you just love how the translucent orbs of pomegranate arils lay against the creamy whiteness of the panna cotta?

Panna Cotta
1 envelope gelatin
3 tbsp. water
1 1/2 cups cream
1 cup milk
1/2 cup sugar
1 tsp. vanilla extract
1/4 tsp. almond extract

1. Sprinkle gelatin over the 3 tbsp of water and let it bloom for a few minutes.
2. Meanwhile, heat cream, milk and sugar over medium flame.
3. Once the cream/milk mixture comes to a boil, turn off flame and add gelatin, stirring gently until it dissolves.
4. Add the extracts.
5. Pour mixture into 6 lightly oiled ramekins and chill until set (about 4-6 hours).
6. Loosen panna cotta gently from mold and serve with fresh fruit or a fruit puree.

Variations: Today, I made a coffee version. I added 2-3 tbsp. of instant coffee granules to the boiling cream. Lovely. Be forewarned though, this dessert is deceptive. One cup of cream weighs in at 800 calories! (Sorry to be a party-pooper...)

Friday, October 17, 2008

Another Ham


Sorry, I forgot to take a photo so the one above is recycled :-) But I finally made another ham yesterday. And this time I had the presence of mind to jot down what I used.

1 large can pineapple juice
1 1/2 c. brown sugar
1 tbsp. whole grain mustard
1 tsp. dried thyme
1 tbsp. peppercorns
1 tsp. dried fennel
1 tsp. coriander seeds
few gratings of nutmeg
1 medium onion, quartered
2 cloves garlic, peeled

and of course, the ham.

I buy this smoked pork shoulder at the grocery. It's not available all the time so when I find it, I grab one and keep it until I feel like making a ham. It's uncooked and the package says to boil it in water for 2 to 3 hours. Instead of water, I used the mixture above. The pork shoulder simmered in my enamelled cast iron pot for 2 to 2 1/2 hours. I took it out of the liquid, sprinkled the top with sugar, and stuck it in a 350 degree over for 30 minutes.

Meanwhile, I skimmed the cooking liquid to remove the fat, reduced it down til it was thick and syrupy, and used that as a glaze/sauce. Yummy! And the best part, lots of leftover ham to get creative with :-)

Saturday, October 4, 2008

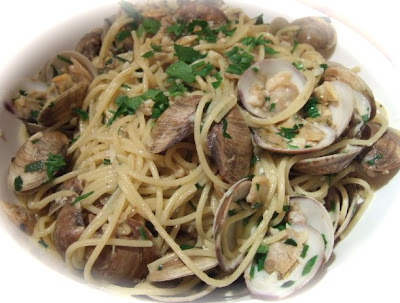
Spaghettini alle Vongole


We had a very memorable farewell meal for my father-in-law in a small, quaint Italian restaurant the other night. They had the BEST spaghetti alle vongole I had ever tried. The pasta was redolent with the taste of the sea and the clams were fresh, clean and flavorful.

So of course, I just had to try making the dish at home. My end product was not quite as transcendental, but better than most generic pasta with clams that I've tried. The trick to making this dish special is removing the pasta from the boiling water a couple of minutes before it's done and finishing the cooking process in the clam sauce/broth. The pasta then absorbs all that rich brininess and garlicky goodness in the sauce which makes for excellent eating.

1 lb. dried spaghettini (any other long noodle such as spaghetti or linguini would work too)
1 whole garlic, minced
1/2 cup olive oil
3 lbs. fresh clams, soaked to make sure they have no sand in them
1 can clams (yes, I cheated), drained, juice reserved
1/2 cup white wine
1/2 cup chopped Italian parsley

1. Put clean clams in a deep pot with white wine. Steam until the clams open.
2. Discard clams which did not open.
3. Remove the clams from the liquid and strain the liquid to remove any sand. You can use a cheesecloth, which I didn't have, or a coffee filter, which I did have.
4. Combine the liquid with the juice from the canned clams. Set aside.
5. In a large pot, saute the garlic in the olive oil until the garlic barely has a hint of gold.
6. Add the whole and canned clams.
7. Add the clam juice and most of the parsley, reserving some for final garnishing.
8. Taste and season with salt (I didn't need to) and freshly ground pepper (this I did).
9. Simmer until you have about 1 and 1/2 cup of liquid left in your pot.
10. Meanwhile, boil pasta in lots of salted water. A couple of minutes before it's done, drain it and throw it into the pot with the sauce.
11. Toss the pasta with the sauce over low to medium heat until the pasta absorbs the rest of the liquid.
12. Serve with a sprinkling of fresh parsley on top.

Note: Remember, no cheese with this dish, please. Traditionally, seafood based pasta dishes are never served with cheese. Although as you can see here, I've never been a stickler for rules.

Molo Soup


The fall weather is upon us and when the chill in the air is beginning to show its face, there is nothing more comforting than a bowl of soup.

Molo soup is a Filipinized version of wonton soup and it's basically made from very similar ingredients. I personally think that Molo soup tastes better...but that's just me :-)

1 lb. lean ground pork
1 lb. peeled shrimp, finely chopped
1 onion, minced finely
1 carrot, minced finely
3 tbsp. oyster sauce
salt and pepper
70-80 wonton wrappers
1/2 chicken or 2 bone in chicken breasts, boiled and shredded (use this to make your chicken broth)
2 heads garlic, minced
4 spring onions, chopped
8 cups chicken broth

Step 1: Make the filling
1. Combine pork, shrimp, carrot onion, and oyster sauce.
2. Season with salt and pepper.
3. Mix well until thoroughly combined.
Note: The food processor makes very quick work of this.
4. Set aside 4-5 tablespoons of the mixture and use the rest to make the wontons.
5. Place half a teaspoon to a teaspoon of filling in each wonton wrapper. Seal edges with a bit of water. Set aside.
Note: To see if seasoning is ok, I usually nuke a small bit in the microwave for 10-15 seconds so I can actually taste it before I go ahead and make the wontons.

Step 2: Fry garlic in oil until slightly golden.
This is a very important step. The savory, crunchy bits of garlic floating on the soup makes this dish. No garlic, no molo soup.
Note: Do this in the soup pot where you will actually make your soup so you can use the garlic infused oil to saute the soup base.

Step 3: Make the soup
1. Saute half of the chopped spring onions in the garlic infused oil for a few seconds.
2. Add the meat/shrimp mixture and break it up as you saute.
3. Add the shredded chicken.
4. Pour in the chicken broth.
5. When the soup is boiling, drop the wontons ever so gently in the broth, stirring gently after every few pieces so they don't stick to each other.
6. Season to taste with salt and lots of freshly ground black pepper.
7. Simmer for 15 minutes or so.

Step 4: Assemble the dish
Ladle soup into bowls and top with fresh spring onions and fried garlic. Enjoy with eyes closed. Feel the warmth of the broth take away the chill of the nippy fall air.

Note: This recipe serves 8-10 people. If that's too much, keep some of the wontons and fry them up another time. It's excellent dipped in sweet chili sauce.

Friday, August 29, 2008

Mystery Ham


See, this is the reason why I blog. I made this ham sometime in May. It was excellent. But now I've forgotten what I used because I made it up as I went along. I remember pineapple juice, star anise, nutmeg, brown sugar, and mustard. Was that all? I don't know. Note to self...do not trust your memory. Write it down!

Halibut and Pancetta in Lemon-Caper Sauce


I rarely follow a recipe to the letter but this was one that sounded so good that I felt that I could use it as is. Tyler Florence is one of my favorite Food Network hosts. His food is simple, flavorful and unapologetically straight-forward. I've tried many of his recipes and they've always come out well. The halibut I bought for dinner tonight was NOT cheap ($22.99/lb!) so I definitely did not want to mess it up. Tyler's recipes (naks, first name basis) are always easy to follow and extremely doable so I was optimistic things would go well.

4 halibut fillets (about 200-250g each) -- I actually used 5 since there were 5 of us
1 cup flour
salt
pepper
4 tbsp. olive oil
2 tbsp. butter
1 cup white wine
juice from one lemon
4 tbsp. chopped parsley
4 tsp. drained capers
8 slices pancetta, cut into strips

1. Preheat oven to 375.
2. Mix salt, pepper and flour in a shallow bowl.
3. Dredge halibut fillets in seasoned flour.
4. In an oven-proof skillet (I used enameled cast iron), heat 2 tbsp of olive oil and brown the fish skin side up for 2-3 minutes.
5. Flip fish over and add pancetta pieces.
6. Place skillet in oven and cook for 10 minutes.
7. Remove fish and pancetta from pan, add butter and deglaze pan with white wine.
8. Add lemon juice, capers and parsley. Adjust seasoning.
9. Reduce sauce to about half.
10. To serve, place pancetta pieces on top of fish and pour a few tablespoons of sauce on top. Garnish with fresh parsley.

I served the fish on top of some cauliflower puree. On the side we had haricots verts in brown butter and rosemary-garlic potatoes. I thought the dinner was a success. Everyone at the table seemed to really like to food! Thanks Tyler!

St. Lawrence Market haul


One of my favorite things about Toronto is this market. I can spend hours and hours just browsing through the many stalls. I have a few favorites that I just have to visit each time I go. There's this guy who makes all his own jams. One day he made me try his durian jam and it was excellent! There's a wonderful kitchenware store overflowing with with all sorts of paraphernalia. I also love the mustard stall with their more than 30 flavors of mustard. My favorite is the balsamic, figs and date mustard. So good!! By the way, did you know that Canada is the largest producer of mustard in the entire world? See, there's more to this country than snow :-)

Today, I decided to take the kids and my mother-in-law, who's visiting from the Philippines, to the market for lunch and to shop for dinner tonight. I've been craving some excellent fish and so it was off to the market to buy my ingredients.

I bought some halibut fillets, fresh figs, goat cheese, triple cream brie, manchego cheese, parsley, lemons, new potatoes, haricots verts, and pancetta. Oh, and I also bought a citrus reamer and some mineral oil to treat my new kitchen bling...a John Boos cutting board. It heavy and huge but I love it!

Saturday, August 16, 2008

Farmer's Market


It was so much fun to look at the varied produce at my local farmer's market. There's nothing more inspiring than seeing fruits and vegetable being sold by the very same people who tilled the soil, sowed the seeds, and tended the plants until they were just ripe for the picking. It's amazing how each seasons brings forth its unique gifts from Mother Earth.

Top row (L-R): so many mushrooms, squash blossoms, lovely bouquets
Middle row: tree-ripened peaches (some of which made it into my pie), onions, carrots
Bottom row: beets and radishes, heirloom tomatoes, pattypan squash

Peach-Blueberry Pie


My trip to the farmer's market this morning inspired me to make this pie. Actually, a trip to The Pie Plate in Niagara-on-the-Lake, where I had the most excellent version of this pie, inspired me to go to the farmer's market. The fresh Niagara peaches at the farmer's market inspired me to try my hand at baking this pie. And baking this pie has inspired me to try baking other fruit pies! :-)

Admittedly, baking a pie is not a quick proposition. You have make the crust, chill it, roll it out, make the filling, assemble the pie and bake it for over an hour. Not something to do on a busy weekday night. But on a weekend, when the mood strikes to make something heart-warming and soul-fulfilling, a fresh fruit pie definitely fits the bill.

Crust


2 1/2 c. flour
1 tsp. salt
2 tbsp. sugar
1 cup cold butter, cut into 1 inch cubes
1/4 c. ice cold water

1. In a food processor, pulse flour, sugar and salt.
2. Add half the butter and pulse for 6-8 seconds.
3. Add rest of butter and pulse another 5-6 seconds. The textire at this point should resemble very coarse corn meal with larger peas sized lumps of butter and flour.
4. Add water a tablepoon at a time, pulsing for a few seconds in between. The final texture of the crust should be sticky enought to hold when pressed with you fingers. The crust should not resemble a dough.
5. Empty the food processor bowl onto a work surface and divide the dough into two balls.
6. Flatten each ball into a disk and wrap with plastic wrap. Keep in fridge for at least an hour.

Filling


5 cups sliced fresh peaches
1 cup fresh blueberries
1/2 cup water
pinch of salt
4 tsp. cornstarch
Few dollops of butter

1. Mix sliced peaches and blueberries with salt and sugar.
2. Let sit for about an hour.
3. After an hour, drain the juice from the fruit mixture into a saucepan.
4. Simmer "syrup" until reduced to about 1/3 cup.
5. Return drained fruit mixture into bowl and add cornstarch.
6. Mix until cornstarch is uniformly dispered.
7. Add back cooled syrup.

To assemble


1. Tip: Work quickly. You want your crust to stay as cold as possible.
2. Roll out bottom crust into a 9-inch pie pan. Roll out top crust into a 10- to 11-inch circle.
3. Pour fruit mixture into bottom crust. Top with a few dollops of butter
4. Put top crust to over fruit mixture.
5. Crimp sides.
6. Put slits on top crust to let steam escape.
7. Wrap aluminum foil around sides of pan to protect the crust edges from browning too quickly.
8. Place pie on a baking dish.
9. Bake in a 425 oven for 30 minutes then decrease temp to 350.
10. Bake 30-40 minutes more until top crust is done.
11. Cool for a few hours.
12. Resist the temptation to cut into the pie. This is probably the hardest step in the entire process!

Friday, August 8, 2008

Apricot-Glazed Chicken with Prunes


I'm a huge Food Network Fan. It's my default channel when I can't find anything else to watch in the 24,578 other cable channels we have. Watching it gets my culinary creative juices flowing. Besides, some of the hosts are not bad looking. Hehe!

I found this Dave Lieberman recipe and I decided to give it a try. I was pleasantly surprised at how good it was! Next time though, I'm going to tweak it a little bit more. I think a tablespoon of whole grain mustard should give it a nice kick of acidity to act as a counterpoint for the sweetness of the apricot glaze. Plus I'm going to add more garlic. Lots more. Like 2 whole heads more. Seriously. :-)


Apricot-Glazed Chicken with Prunes


6 chicken thighs and 6 drumsticks
1 cup apricot jam/preserves
15 whole prunes
1 head garlic, peeled, cloves kept whole
1 tbsp. salt
1 tbsp. pepper
1 tbsp. apple cider vinegar
1/3 cup olive oil
30 sage leaves

1. Mix everything in large bowl.
2. Arrange chicken pieces in a single layer in a large baking dish.
3. Tuck the prunes, sage and garlic cloves in between chicken pieces.
4. Pour the marinade on top of the chicken.
5. Bake at 400 for an hour or so until brown.
6. Transfer chicken, prunes, sage and garlic pieces onto a serving platter.
7. Pour liquid in the baking dish into a bowl.
8. Skim off the fat (there will be LOTS).
9. If the sauce is too watery, you can reduce it a bit to thicken it.
10. Pour sauce on top of everything.

We had this for dinner with some garlic mashed potatoes. Yum!

Frozen Brazo

This has been my most recent obsession. Ever since Tita N brought one to the "welcome back" potluck, this dessert has not ceased to torment me. I lamented the fact that this marvelous creation could not be had in Toronto! I just HAD to make it. I had no choice.

This was my first attempt...


I brought to Tita M and Tito O's home when we had lunch there, and my oh my, was it good! BUT...not as good as I'd like. The crust was bit too crunchy rendering the dessert almost impossible to slice gracefully. Plus, the meringue layer was too small for the rest of the "cake."

Second attempt...


Sorry for the pic. I couldn't wait to dig in.

I made a thicker custard layer for this version, which I really liked. The crust though was still not what I wanted. But the meringue layer was perfect for the size of the rest of the brazo, so at least aesthetically, it looked better than the first one.

I haven't had a chance to make a third one. I'm afraid I might go into a diabetic coma if I have Frozen Brazo more than once a month.

So next time we have guests, I will try another version. Maybe the third time will be a charm.

Tuesday, July 1, 2008

Birthday Dirt Sundae


I made this birthday cake version of the springtime sundae for Son #2's 10th birthday and because it was a boy's party, I decided not to use flowers but used gummy worms instead. I also used a bigger planter instead of individual pots. The boys found it quite amusing :-)

Just a tip though, do not serve this straight out of the freezer. Frozen solid ice cream is very hard to scoop and will lead to oreo crumbs everywhere. Trust me, I learned the hard way...

Springtime Sundae

This was a dessert too cute to pass up :-)

I found a similar "project" on one of my regular blog reads and thought it would be perfect for a "welcome to spring" gathering we had at S&A's house.

Start by buying a few small plastic pots and baking a batch of brownies. Get your biscuit cutter or other round thing-a-ma-jig and cut out a circle of brownie to fit the bottom of the pot. Like this...


Then spread a layer of dulce de leche over the brownie. Just like so...


Stick a trimmed drinking straw in the middle then fill the pot with vanilla ice cream, chunks of your favorite candy bar (Mr. Big, in this case) and more brownie chunks. Really, at this point, go wild :-)


Keep the entire thing in the freezer and just before serving, cover the entire thing with crushed oreo cookies, get a nice flower, stick it in the straw, and voila!


Aren't they just adorable?!

Saturday, June 28, 2008

Another attempt at chocolate cake...


"O, chocolate cake! Why art thou such an elusive prize? Where, oh, where shall I find thy perfect recipe?"

Yes, I am still on this journey to find the perfect chocolate cake recipe. My previous chocolate cake fiasco will not deter me. I am resolute in this quest.

This time I tried a version of the Texas Sheet Cake, combined it with a butterscotch filling recipe from Joy of Baking, and used a loose version of the Texas cake icing to frost it. It was good, at least better than the aforementioned attempt, but it was still not what I was looking for. At least it looks good, right? Plus, I didn't set anything on fire :-)


Chocolate Cake with Butterscotch Filling


CAKE
PART A: In a mixing bowl, sift together
2 cups flour
2 cups sugar
1/4 tsp. salt

PART B: In a saucepan
1. Melt 2 sticks of butter.
2. Add 5 heaping tbsp. cocoa and 1 tsp. instant coffee granules. Mix well.
3. Add 1 cup boiling water. Turn off heat and mix together until smooth.
4. Pour Part B mixture into Part A mixture.

PART C: Mix together
2 eggs, slightly beaten
1 tsp. baking soda
1 tsp. vanilla

Add Part C Mixture into Part A/B mixture. Pour into 2 9-inch cake pans and bake at 350 for 25 minutes. Cool the cakes before frosting them.


BUTTERSCOTCH FILLING
1. Melt 1/2 stick unsalted butter, 1/8 cup water and 1 tbsp. corn syrup in a saucepan.
2. Add 1/2 cup sugar and mix gently until sugar is dissolved.
3. Cook over low-medium heat until caramel in color.
4. Turn off heat and add 1/4 cup heavy cream.
5. Whisk together until smooth.
6. Add 1/2 tsp. vanilla and a pinch of salt.
7. Cool in fridge until thick and spreadable.


FROSTING
1. Melt 1 1/2 sticks butter in a saucepan.
2. Add 4 heaping tbsp. cocoa and mix until smooth.
3. Turn off heat.
4. Add 6 tbsp. milk and 1 tsp. vanilla. Mix.
5. Add about 400g powdered sugar until you get the right consistency.

TO ASSEMBLE
1. Slice off the top of one of the cakes to make it flat.
2. Spread about 3/4 of the butterscotch filling and place second cake on top.
3. Frost with chocolate frosting (you will have left-overs here).
4. Put the rest of the butterscotch sauce in a pastry bag with a round tip, or in my case, a small ziplock bag with a corner snipped off. Drizzle the cake with the butterscotch.

Baked Beans


This is my new favorite side to baby back ribs. Whenever I make ribs, like I did a couple of nights ago, I just HAVE to make these beans. Sometimes I even begin to think that I like the beans more than the ribs!

Baked Beans
1 can red kidney beans, drained and rinsed
3 tbsp. maple syrup
2 tbsp. ketchup
1 heaping tsp. whole grain mustard
1/2-1 tsp. dried rosemary
salt
pepper
3 bacon strips, cut in half

1. Mix first 5 ingredients together in an oven-proof dish.
2. Season with salt and pepper to taste.
3. Lay bacon strips on top of the beans.
4. Bake in a 350 oven for about 20-30 minutes until bacon is slightly crisp around edges.

So good and so easy :-)

Friday, March 28, 2008

Callos ala Madrilena


I've mentioned that being under Spanish rule for 300 years has left an indelible mark on Filipino culture. This dish is another testament to that.

I grew up with my mom's Callos frequently gracing the buffet table during special occasions like Christmases and birthdays. As a child, I often skipped over this dish and gravitated toward more mainstream fare like pasta and fried chicken and lechon. But as I got older and my tastebuds matured, I began to appreciate the complex marriage of the tripe, chorizo and ham, slowly simmered until the flavors became one. It's been a while since I've had my mom's Callos...years and years and years. But the memory has been imprinted in my culinary consciousness.

I was walking around the grocery one day, and lo and behold, they had lots and lots of tripe! Cleaned, parboiled and packaged ever so neatly, they called to me and gave me the perfect opportunity to finally try my hand at making one of my mom's specialties. After I bought the tripe, off to the Latin market I went to buy fresh chorizos and a day later, there it was.

I didn't have a recipe so I cooked it al oido (which literally translates to by ear...my mom uses this phrase a lot to mean just play it by ear/just wing it/make it up as you go along...anyway, you get the idea). It turned our really well. Really, really well. And there was A LOT of it. Much more than what our family of four could consume. Besides, the 2 kids weren't crazy about tripe. It was seredipitous that a day later, we were going to Tito O and Tita M's house to celebrate Lola H's 96th (!!!) birthday. So I brought this huge container of Callos and it became part of a wonderful celebration, just like the Callos of my childhood.

Callos ala Madrilena


400 g beef tendon, sliced into 1-inch pieces
500 g tripe, cleaned and sliced into 2 inch long strips
3 pcs. chorizo (sliced if using canned/dried, removed from casing and crumbled if using fresh)
1-2 cups chopped ham
1/2 cup olive oil
1 large onion, sliced
1 red pepper, diced
2 tsp. smoked paprika
1 can tomato paste
1 can whole tomatoes
1 tsp. pepper
1 tsp. chili flakes
1/2 cup grated sharp cheese
1 cup green olives, drained
2 tbsp. knorr seasoning
1-2 cups beef broth
1 large can chick peas/garbanzos, drained
sugar to taste
salt to taste

1. In a large, heavy pot, saute the onion and pepper in the olive oil until soft.
2. Add the chorizo and saute until it renders it fat.
3. Add ham, paprika and tomato paste.
4. Add the tripe and tendon and saute for a couple of minutes.
5. Add the tomato paste, tomatoes, pepper, chili flakes, knorr and pepper.
6. Cover with a tight lid and simmer slowly for 4-5 hours, until the tripe and tendon are very tender. Check every so often to stir and make sure that it doesn't dry up. Add beef broth as needed just to keep the sauce going.
7. When tender, add garbanzos, olives and cheese. Adjust seasoning with salt and sugar.
8. Simmer for 15 minutes more to help all the flavors meld together.

The seasoning of this dish will depend a lot on the flavor of the chorizo that you use. I was lucky enough to find fresh chorizo. But I'm sure canned or dried chorizo would taste just as good. The amount of salt you will need depends on how salty the other components of the dish are, so wait until everything is tender and adjust your seasonings then.

Sugar is something that I think many people underuse when cooking savory dishes, especially tomato-based ones. Vine-ripened tomatoes are very sweet and when picked at the peak of their flavor probably would not need any additional sugar. However, I find that canned tomatoes lose a lot of that sweetness and they often do not have that balance of sugar and acid. So I often will add a pinch (or more) of sugar to many of my tomato-based dishes. Of course this is a matter of preference and if you don't like any hint of sweetness in your savories, just omit this ingredient. You will regret it though. Hehe!

Oreo Cheesecake


Here's another variation of the cheesecake recipe I posted before...

The picture above was actually leftover batter that I baked in individual cupcake holders. I topped them with a mixture of oreo and graham cracker crumbs and baked them at 350 for 20 minutes.

For the crust of the real oreo cheesecake, I used 2 cups of crushed oreos mixed with 1/4 cup butter. Note that I used half the butter I would normally use for a graham crust. The white filling also acts as a binder, thus decreasing the butter requirement. If you are using boxed oreo cookie crumbs, which does not have the filling, use 1/2 cup of butter, like the original recipe. Bake this crust for 10 minutes at 350.

For the cheesecake itself, just omit the lemon extract and add a cup of chopped oreos to the batter. Same baking time, same temp.

Guinness Stout Ice Cream


We had a few friends over for the Hubby's birthday/Easter and S&A brought a pint of this very unusual ice cream. Apparently, Ed's (the ice cream shop) only makes this flavor once a year...for St. Patty's day. And once it's gone, it's gone. At least until the next year.

I really, really, really liked it! At first I thought it would taste all weird, but it actually reminded me of coffee ice cream with its slight bitter edge. The malt definitely came through, giving this ice cream a very sophisticated flair. The stout flavor didn't assault your taste buds but instead crept up stealthily, lingering at the very back of your mouth. Subtle but sublime.

The texture of the ice cream was excellent too. Smooth and creamy with a full mouthfeel. The people at Ed's might not know how to spell. But they sure make a d@mn good pint...of ice cream.

Black Bean Dip


As requested, A, here's the recipe for the black bean dip :-)

This dip was introduced to me be a Costa Rican friend and it has made many an appearance on our table. The original recipe she gave me called for canned refried beans but when I looked at the label on the can, I was shocked at how much fat and salt it had! So I now make this from plain, unsalted canned whole black beans and I save on all that fat, which I reserve for the chips. Hehe!

Because it's low-fat and healthy, it makes me feel less guilty about indulging in corn tortillas :-)

BLACK BEAN DIP

1 large can black beans, drained
2 tbsp. oil
1 medium onion, chopped
1/2 red pepper, chopped
salt and pepper
pinch of sugar
2 tbsp. lizano sauce

1. Saute the onions in oil over medium high heat until slightly brown.
2. Add the chopped pepper and saute until peppers are also slightly brown.
3. Pour in beans and stir until combined.
4. Puree with a hand blender (or with a normal blender).
5. Season with lizano sauce and adjust seasoning with salt, pepper and sugar.
6. Serve with chips.

Lizano sauce or Salsa Lizano is like the ketchup of Costa Rica. It's a condiment made from vegetables and some people liken the taste to worcestershire. I kinda agree, but not quite. Lizano has a distinct latin flair to it that I can't quite put my finger on. Maybe they roast some of the veggies before making the sauce because it has a smoky background that adds to the depth of flavor.

Salsa Lizano has become a mainstay in my pantry. I add it to store-bought salsa, beans and rice, chili, beef for my tacos, etc., etc. Such a great discovery!

Friday, March 7, 2008

Dutch Baby


I was watching some show on the Food Network and they featured a restaurant that serves Dutch Babies. I had never heard of this billowy puffs that were the German version of the pancake. Why it's called a Dutch Baby if it's German is beyond me.

Ok, I googled it, and this is what Wikipedia says...

German pancake? Dutch baby?


Don't you just love Wiki.

I googled a recipe, found one that many people had tried and made one.

It was very pretty and tasted good. But I much prefer normal pancakes myself. And the boys did not like it.

So thus ends my Dutch Baby experimentation.

Dutch Baby


3/4 cup milk
1/2 cup flour
2 eggs
1 1/2 tbsp. sugar
1/2 tsp. vanilla
1 tbsp. butter
2 tbsp. confectioners sugar

1. Place an oven proof 10-inch skillet in the oven and preheat to 425.
2. Meanwhile, mix all ingredients except confectioner's sugar together.
3. Take out skillet, place butter and swirl around until melted.
4. Pour batter into skillet and bake for 15 minutes.
5. Decrease heat to 325 and bake another 8-10 minutes.
6. Take out from oven, sprinkle with confectioners sugar and serve immediately.

Note: The pancake deflates VERY quickly so serve it as soon as it comes out of the oven for maximum drama and flair :-)

Crispy Pata


Filipinos have a long-standing love affair with crisp, crackling pork skin. That's understandable, right? Who can resist biting into a piece of lechon or chicharon or bagnet or lechon kawali? But I think my favorite of all crunchy-skinned pork dishes is crispy pata. Because not only do you have the crackling skin, you also have the tender, gelatinous sinews of the pork hock.

Traditional crispy pata is a pork hock, boiled in seasoned water, dried for a while, then deep fried until the skin turns blistered and golden. I don't have the time, patience or equipment to do all that, so I tried crispy pata in my turbo broiler and it came out great! Yay!!! No longer do I have to go out to partake of this gastronomic delight...I can't have it right here, in the comfort of my own home, where I can gnaw on the bones to my heart's content.

1. Take a pork hock and rub generously with salt and pepper.
2. Cook in the turbo at 300 until skin turns brown and crisp. Mine took about an hour.
3. Flip the hock and turbo for about 20 minutes more to get everything cooked just right.
4. Serve with a sauce made with 1 part soy sauce, 1 part vinegar, sugar and chopped onions. Chili peppers are optional.

Jam Bars


It's not I haven't been cooking. It's just that the past few months have been so hectic that I haven't been inspired...inspired to cook, inspired to write, inspired to create. BUT...I'm baaack! :-)

Why? Because procrastination(unemployment + major life-altering exam) = creativity. Do you still remember your algebra? Hehe!

So anyway, I made these jam bars for our Valentine's get-together and they were very well received. I personally favor fruit desserts over chocolate ones (gasp!) so these were right up my alley. Plus it allowed me to use up some 5-fruit jam that remained untouched in the fridge because it wasn't the "right brand."

Jam Bars


2 sticks cold salted butter, cut into pieces
1 3/4 cups ground almonds
2 cups flour
1 cup sugar
1 1/4 cups jam of choice (the one I used was a combo of strawberry, raspberry, blackberry, blueberry and grape)

1. In a bowl, mix together almonds, flour, and sugar.
2. Using a pastry cutter (or your hands), cut butter into dry ingredients until the mixture is crumbly.
3. Transfer half the mixture into a 9x13 baking pan. Press firmly into pan.
4. Bake in a 350 oven for about 15-18 minutes until lightly golden.
5. Remove crust from oven and cool for about 30 minutes.
6. Spread jam evenly over crust.
7. Scatter the rest of the crumb mixture over the jam.
8. Bake again for about 22 minutes.
9. Cool then cut into 2 inch bars.

Friday, January 18, 2008

Butternut Squash Soup


What could be better than a steaming, hot bowl of sweet, rich butternut squash soup topped with salty, crispy bacon bits?

Butternut squash soup
1 whole butternut squash, peeled and chopped into 2 inch pieces
1 carrot, peeled and chopped into 1 inch pieces
1 medium onion, chopped
6 strips of bacon, sliced into 1/4 inch pieces
6 cups chicken broth
1/4 tsp. curry powder
pinch of freshly grated nutmeg
1 bay leaf
1/2 cup milk or cream
salt and pepper to taste

1. In a pot, fry bacon until it renders its fat. Reserve bacon bits and remove all but 1 tbsp. of the bacon fat.
2. Saute onion and carrots.
3. Deglaze pan with chicken broth.
4. Add the squash, nutmeg, curry powder and bay leaf.
5. Simmer for 20-30 minutes until squash and carrots are tender.
6. Puree with a hand blender (or use a real blender or food processor).
7. Add milk and season with salt and pepper to taste.
8. Serve topped with bacon bits.

I love making this for dinner and bringing the left-overs for lunch the next day. It's also a great way of getting the boys to eat more veggies. It's true the bacon makes it slightly evil, but it's definitely worth it! :-)

Pork Braised in Milk


Milk?! Pork in Milk?!!!

That was my first reaction too when I read this Marcella Hazan recipe. But pork was on sale (2 lb roast for $5) and I had a liter of milk on the verge of its expiration date so I decided to jump in and try it. And boy am I glad I did. I will never doubt Marcella Hazan again. Ever. Tomato sauce with butter and, now, pork with milk. Two super simple recipes that have worked wondrously well. Thank you to my Secret Santa for the Marcella Hazan cookbook. I can't wait to try more of her food!

Ingredients:
2 1/2 lb. pork rib roast or 2 lb. boneless pork roast
1 tbsp. butter
2 tbsp. cooking oil
salt
freshly ground black pepper
6 whole garlic cloves (not in the original recipe)
2 1/2 cups milk (the recipe called for whole but I used 2%)

1. In a heavy pot (I used an enamelled cast iron one), heat butter and oil over medium high heat. Season meat with salt and pepper and brown well (and I mean well..don't be impatient, this step is VERY important) on all sides.
2. When meat is nicely caramelized on all sides, throw in the garlic cloves, brwon for a minute or two then pour in 1 cup of milk.
3. Bring to a simmer and turn heat down to low just until you see bubbles breaking the surface. Cover partially and simmer for about an hour until almost all the milk has evaporated and all that is left is this wonderful sauce of browned milk solids.
4. At this point, add another cup of milk and simmer covered for 30 minutes. Partially open lid and simmer for another half hour until once again most of the milk has evaporated.
5. Add the last 1/2 cup of milk and simmer for another 20-30 minutes, making sure to scrape the bottom of the pan every so often to make sure that there are no burnt parts. Adjust seasonings at this point too.
6. Once all the milk has evaporated into this nutty, thick sauce, turn off heat and remove pork. Transfer to a cutting board.
7. Let the pork rest for about 5-10 minutes. Meanwhile, spoon off the fat from the sauce.
8. Slice pork and spoon milk sauce on top.

Thursday, January 10, 2008

Meyer Lemon Blueberry Muffins


Meyer lemons used to be the "it" thing in the culinary world for a while. It seemed like all the cooking shows on The Food Network and all the menus of all the restaurants (ok, I exaggerate, not ALL) had some Meyer lemon thing or other. Because I was back home then and Meyer lemons couldn't be had, I could only imagine how this citrus fruit, described as a cross between an orange and a lemon, tasted.

A few days ago, I saw a bag of Meyer lemons at the local grocery store. One bag of 8 lemons for $1.50. How could I resist, right? And that's how my very first Meyer lemon venture came into fruition.

Meyer Lemon Blueberry Muffins

1/2 c. milk
zest of 2-3 Meyer lemons
2 c. flour
2 tsp. baking powder
pinch of salt
6 tbsp. unsalted butter
1 c. sugar
2 eggs
2 tbsp. Meyer lemon juice
1 c. frozen blueberries

1. Heat milk but do not boil. Remove from heat and add zest. Let cool.
2. Cream butter and sugar until fluffy. Add eggs one at a time and beat well.
3. In a separate bowl, sift together flour, baking powder and salt. Set aside.
4. Meanwhile, add milk and lemon juice to butter mixture and mix well.
5. Add flour in 2 batches and mix just until incorporated.
6. Finally, fold in blueberries.
7. Fill 12 muffin cups and bake at 400 for 20 minutes.
8. If you want, you can glaze the muffins with a mixture of Meyer lemon juice and powdered sugar.

Tuesday, January 1, 2008

Baked Brie


This is my new favorite "fancy" appetizer. It's super easy, looks impressive, and tastes wickedly delicious. There's really no recipe. Just buy a wheel of double cream brie, wrap it in 4-5 layers of phyllo (also store bought), bake at 375 for 15-20 minutes until the phyllo turns golden brown. Serve with flatbreads or crackers with a fruit jam/jelly on the side. Yum-yum.

For our Christmas dinner, we started with a plate of arugula salad with pears and walnuts plus the baked brie with lingonberry preserves (from Ikea...sshhh, don't tell anyone). This was followed by a roast served with rosemary potatoes and asparagus and dessert was cheesecake with blueberries.